Importing Custom Crystal Reports
You can import custom Crystal Reports for use in EPASS Reports. Once a report has been imported, it inherits all of the same functionality that regular EPASS Reports have, including Distribution, Scheduling, Bursting, and controls.
This topic walks you through the necessary steps for importing a custom Crystal Report and modifying it within EPASS Reports.
Custom reports are stored in the database. When you import a report into EPASS, the system reads the file only once (during upload). If you later modify the report, you must also update it within EPASS Reports. Changes to the original file are not applied automatically.
Prohibited Characters
The following special characters can not be used when naming any element in EPASS Reports (for example, report names, group names, parameter names):
! ? @ # $ % ^ & * ' " , . : ; ( ) [ ] { } < > \ / | ` ~ = +
Using these characters can result in errors or your custom Crystal Report to not function correctly.
Adding Reports
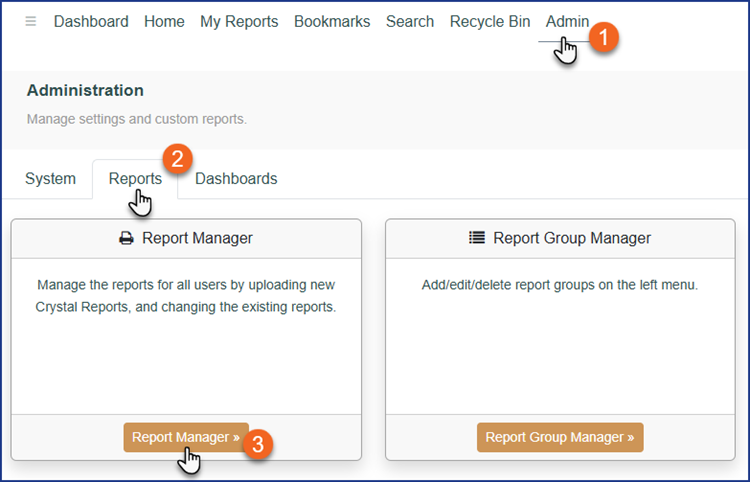
To add a custom report, open the Report Manager (Go to Admin > Reports > Report Manager)
When you open the Report Manager screen, fields in the top half of the screen should be empty and ready for you to add your report. If you had clicked on another report and there are now values in these fields you can click the New button to clear them for your new report.
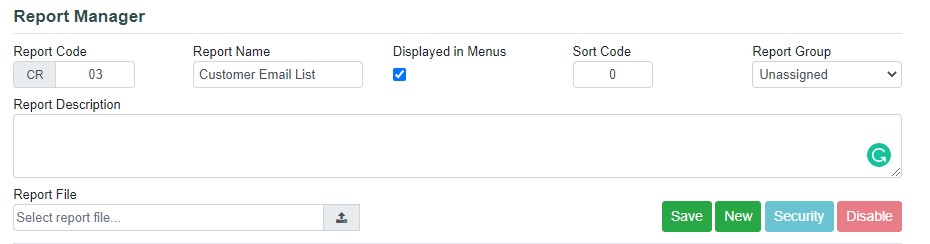
To create a new report you need to specify the following values:
| Report Code | All Crystal Reports are assigned a report code beginning with “CR” and ending with a number. When you are adding a new report it will already have defaulted the next available number. You can choose a custom value but the report codes aren’t too important on their own – they mainly help you identify each report with a short code. |
| Report Name | This is the short name for the report that will appear in the report menus. |
| Displayed in Menus | This option controls if a report appears in the menu or not. If you want to temporarily remove a report from all users without changing security you can do that quickly using this option. |
| Sort Code | The Sort Code allows you control the position of the report in the left menu. All reports have a Sort Code and the left menu is listed in Sort Code order. |
| Report Group | This is the group (Invoicing, Purchasing, etc.) that the report belongs to on the left menu. See Adding Custom Report Groups to add additional groups to this list. |
| Report Description | This is the long description for the report. Try to put as many details as you can about the report in this field, as that will help you easily find this report later when searching for specific terms. |
| Report File | Choose the report file (.RPT) to be uploaded. |
The following actions can be performed for a report:
| Save | The Save button will save any values that were changed for this report. If you specified a Report File, which is required to add a new report, then that file will be uploaded and saved in the database. |
| New | Click the New button to clear the values in order to add a new report. |
| Security | If you are allowed to assign security to other users in EPASS then you will have the ability to assign security for a report from this screen. If you are not allowed to assign security to other users in EPASS then only you will have access to any new reports that you add. |
| Disable | This will remove the report from the menu and also remove any bookmarks for this report. You will still be able to access any previous history for the report. |
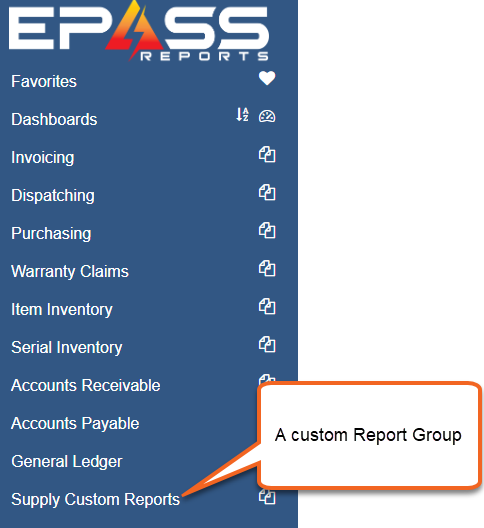
Adding Custom Report Groups
In addition to adding custom reports to existing Report Groups, you can organize them further by adding them to custom groups that you create. You can also choose to have these custom groups appear in the sidebar menu.
Steps
-
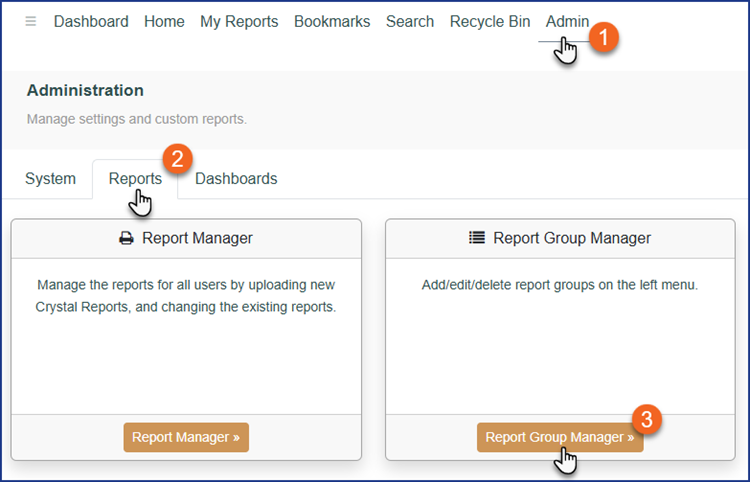
Go to Admin > Reports > Report Group Manager.
-
In Report Group Name, enter a name for your custom group.
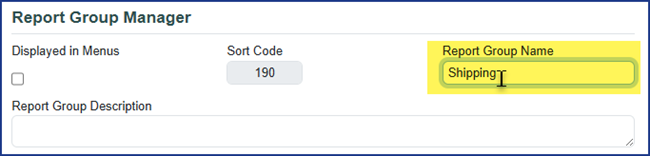 Note
NoteReport group names can't contain any special characters, including spaces.
-
Enter a Report Group Description.

-
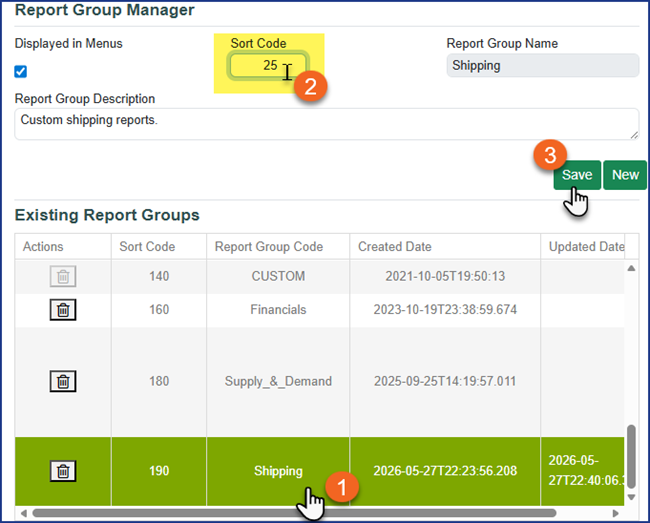
If you want the custom group to appear in the sidebar menu, select Displayed in Menus.

-
Click Save.
-
If you selected Displayed in Menus, the group won't appear until you add a report to it from the Report Manager.
-
The reports description appears in the sidebar, not the report name.
-
When you first create a custom group, it's default position in the sidebar is at the bottom. To change its position, go back into the Report Group Manager, select the custom group, enter a new Sort Code, and then click Save. The lower the Sort Code, the higher the group appears in the sidebar.
-
Changes to the sidebar don't appear until you log out of EPASS Reports and then log back in.
Modifying Existing Reports
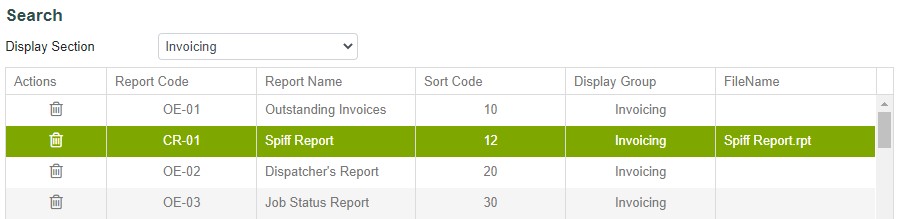
To modify an existing report you need to first find the report in the Search section at the bottom of the page. Use the Display Section drop down to help you find the report you’re looking for. You have the following options available in the Display Section drop down:
| All | This option will show all reports, including both EPASS Reports and Crystal Reports. |
| Custom | This option will show only your Crystal Reports. |
| Modules | Each module is also listed individually, allowing you to change the sort order module by module. |

If you place a Crystal Report in one of the existing module menus you will likely also want to change the sort position within that menu – this is where the Sort Code comes in. In this example we have placed the Crystal Report called “Spiff Report” into the Invoice menu and gave it a Sort Code of 12 so that it displays between the OE-01 (Sort Code 10) and the OE-02 (Sort Code 20). To change the order you simply need to adjust your Sort Code value to place it in the appropriate position.
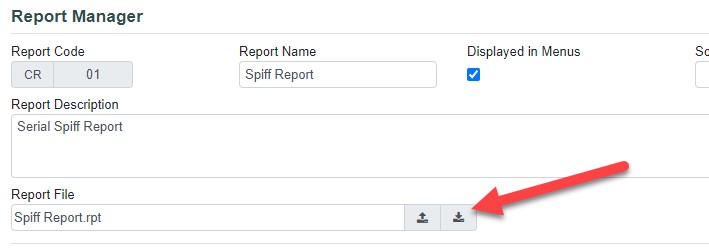
Downloading a Crystal Report
Once you have uploaded a Crystal Report you do not need to worry about saving a separate copy of it on your network (although you are welcome to!). If you ever need to make changes to the report in the future you can download the original report from EPASS Reports and it will be saved to the location of your choice in it’s original .RPT format. You can then make any required changes and re-upload it when ready.
Customizing the UI
In Crystal Reports you set up “parameters” that allow you to choose the criteria for your reports, then in the report itself, you make it filter out using those values. This is an example of the Crystal Report parameters screen that you would normally see:

When this report is added to EPASS Reports the parameters will be displayed using our own UI controls, giving you a consistent look to every report – whether they were created by EPASS or by your own team. Here’s what the same report looks like through EPASS Reports:
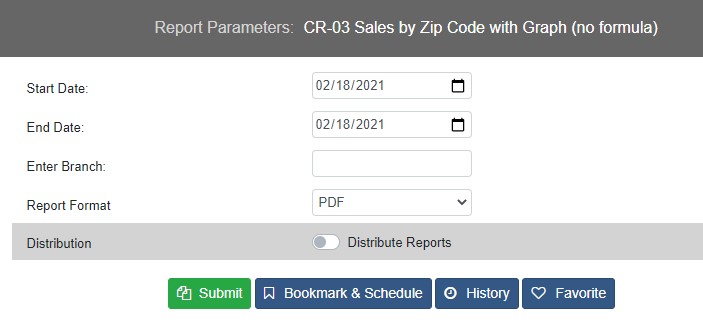
One thing you’ll notice about the parameter screen above is that the branch is just a text field – it would be nice if it was a drop-down letting you choose from your branches, rather than having to remember the codes. Crystal Reports does let you turn a field into a drop-down but it’s not an easy task unless you are an advanced Crystal Reports user.
In EPASS Reports, we have made it easy to replace fields with dropdowns, multi-select controls, finder controls (useful for choosing from larger tables like Customer, Model, etc.), and more. All you need is one formula field in the report named “EPASS-CONFIG”.
To Create the EPASS-CONFIG Formula
- In the Crystal Report editor, create a new formula.
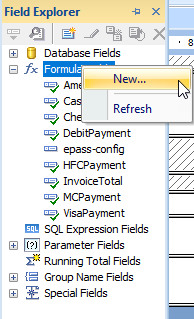
- Name the formula
EPASS-CONFIG.

The formula name is not case sensitive, but it must be spelled exactly as shown, otherwise it won't work.
- Inside the formula, define which user control is used for each parameter. If the user control needs to get data from somewhere, define the table as well.
Follow this structure:
Local StringVar ePASS_Parameters := "[ParameterName='PARAMETER_ID', UIControl='CONTROL_NAME', Table='TABLE_NAME']";
Supported Tables
The following tables are can be used with the EPASS-Config formula:
| BankRecTXType | BinLocation | Branch | Brand | Carrier |
| City | Color | Comment | Commision | Complaint |
| CreditReason | CreditStatus | Dealer | Department | DispRoute |
| ExtWarranty | Failure | Features | GLMaster | InventoryDivision |
| InventoryType | InvType | Item | JobStatus | LaborRate |
| ListPrice | Location | MailingCategory | MapZone | Misc |
| MiscType | Model | Month | MonthDays | OEM |
| Package | PassUser | PaymentType | Picker | PickerBins |
| Priority | Product | ProductMajor | ProductMinor | Qualification |
| RelativeDayType | ReportType | ReturnInitiatedBy | ReturnOutcome | ReturnReason |
| Route | SaleReferral | SalesDivision | Salesperson | SerialType |
| ServicePerformed | ShippingMethod | ShipVia | Supplier | SupplierType |
| Table1 | Table2 | TableType | Tax | Team |
| Technician | TransferStatus | TripCharge | User |
-
UIControl names are not case sensitive.
-
Parameter IDs are customizable.
-
If you want to use a hardcoded list for a SimpleDropDown or Combobox UI Control, then Table must equal blank (
Table='').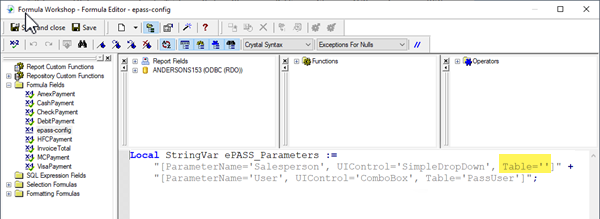
LOCAL StringVar ePASS_Parameters :=
    "[ParameterName='StartDate', UIControl='DateControl', Table='']" +
    "[ParameterName='EndDate', UIControl='DateControl', Table='']" +
    "[ParameterName='Branch', UIControl='ComboBox', Table='Branch']";
The example above is what the formula would look like for our example report. We used ParamterName, UIControl, and Table in the example, but you can customize these parameter IDs if you need to.
The Branch parameter is defined as a “Combobox” with the data coming from the table “Branch”.
Once this formula is in place, the Branch selection is changed to a more user-friendly control.

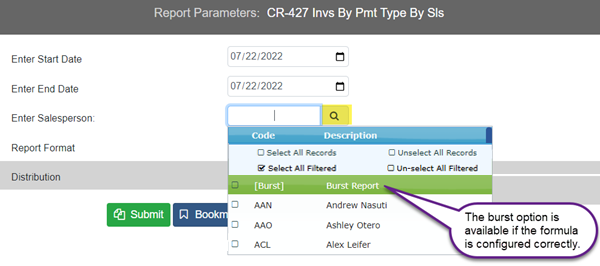
Bursting a Crystal Report
The bursting feature is supported only for the Salesperson and Technician tables, and a report can reference only one of these tables at a time. To enable bursting in a Crystal Report, the EPASS‑CONFIG formula must include the setting isBurst = true.
To burst a Crystal report, you need to add a specific code string to the EPASS-CONFIG formula.
- Open the EPASS-CONFIG formula.
- Enter the bursting code string following this example:
LOCAL StringVar EPASS_Parameters :=
"[ParameterName='Tech', UIControl='ComboBox', Table='Salesperson', isBurst=true]";
The parameters must be entered in the order shown (ParameterName, UIControl, Table, isBurst), otherwise you won't be able to select the Burst Report option within the report parameters.
Any custom reports built by EPASS will start to include the formula to use rich user controls, but any report writer who is familiar with formulas is welcome to use them as well. We will also include the following comment in the formula which documents how the formula works.
Configuration File for EPASS Reports
EPASS Reports will read an .rpt file to determine the basic types of parameters to display to the user. In many cases, we want to provide the user of the report a better user experience by using our rich user interface controls.
For example, a report may have a "branch" parameter which is simply a "string" value. If we want EPASS Reports to instead display a search tool, we can indicate that here. Any parameters omitted from this file are treated as their basic type.
UI Types may include:
| UI Type | Code | Interface Control |
|---|---|---|
| Search | UIControl='Search' | |
| Dropdown | UIControl='SimpleDropdown' |  |
| Combo Box | UIControl='Combobox' | 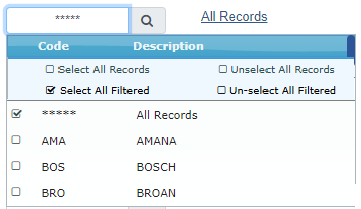 |
| Text Box | UIControl='Textbox' | |
| Integer | UIControl='Integer' | |
| Decimal | UIControl='Decimal' | |
| Date | UIControl='DateControl' | 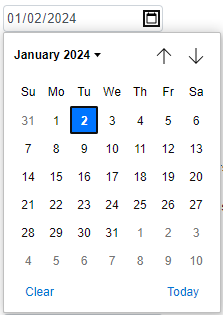 |
| Check box | UIControl='Checkbox' | |
| Time | UIControl='TimeControl' | 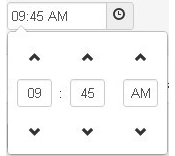 |
| Date and Time | UIControl='DateTimeControl' | 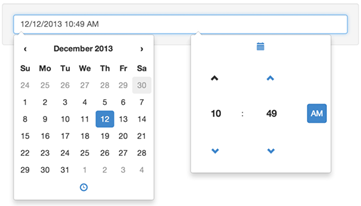 |
- Spaces between the = sign do not matter. A=B and A = B are considered identical.
- Make sure parameters ALWAYS follow the order of ParameterName, UIControl, Table—never switch these around.
- Combo Box and Dropdown don't need to point to a table. These UI types can use values that have been hardcoded in the Crystal Report. In this case, make sure that Table is blank in your formula (
Table=''). - Search needs a table. Any table or view value must have a "Code" and "Description" field.
- When bookmarks are created for custom reports, all dates are automatically changed to relative date controls in the bookmark. See Bookmarks and Scheduling for more information.
Selecting All Records From a Table
For Crystal Reports that include a multi-select parameter, a Select All Records option is automatically added to allow the inclusion of all rows in the underlying table. Choosing Select All Records will include ALL the table records, not only the records that are selected in the combo box.
For optimum performance, we recommend that you also add the option ALL in the Crystal Report's parameter setting, as well as modify the record selection formula as shown in the examples here:
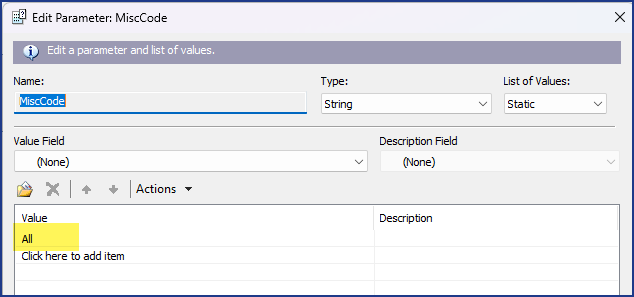
{Invoice.Estimate} <> "ESTIMATE" and
(
    (
        {?StartDate/CreatedDate} = "Start Date" AND
        {Invoice.InvStartDate} IN {?FromDate} TO {?ToDate} AND
        ({Misc.Code} = {?MiscCode} OR {?MiscCode} = 'ALL')
    )
    OR
    (
    	{?StartDate/CreatedDate} = "Created Date" AND
        {InvoiceMisc.DateCreated} IN {?FromDate} TO {?ToDate} AND
        ({Misc.Code} = {?MiscCode} OR {?MiscCode} = 'ALL')
    )
)
The All option is case insensitive.
In the example record selection formula above, the logic allows a Crystal Report to be run with:
- filtered values selected by the user for the parameter (for example,
?MiscCode). - all values from the Misc table if the Crystal Report parameter contains the ‘All’ option.
Crystal Reports that use Database Views
To run a Crystal Report that uses a database view, the following requirements must be met:
-
The view name must start with
view(not case-sensitive).Example- viewPOSupplierCode
- VIEWPOSupplierCode
-
The
CodeandDescriptioncolumns must be present. Only these columns are shown in the UI. -
The
Codecolumn must contain unique values. Parameters with duplicate values will load in the UI, however the report won't print from EPASS Reports.
Configuring EPASS Reports Parameters
UI parameters such as Combo Box, Dropdown, and Simple Search can retrieve and display data from a database view. To enable this, you must include the name of the view in the Table ID in the EPASS-CONFIG formula.
LOCAL StringVar ePASS Parameters :=
"[ParameterName='Supplier (Dropdown)', UIControl='SimpleDropdown', Table='viewPoSupplierCode']" +
"[ParameterName='Supplier', UIControl='ComboBox', Table='viewPoSupplierCode']" +
"[ParameterName='Supplier (Search)', UIControl='Search', Table='viewPoSupplierCode']";
Troubleshooting Scenarios
-
Duplicate
Codevalues.-
If the
Codecolumn does not include unique values, the following error appears: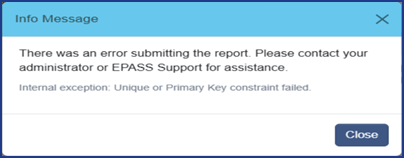
-
-
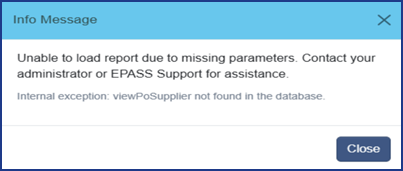
Missing view.
-
If the view is not found in the database, the report won't load and the following error appears:
-
-
Missing
CodeorDescriptioncolumns.-
If the
CodeorDescriptioncolumn is missing in the view, the following error message appears: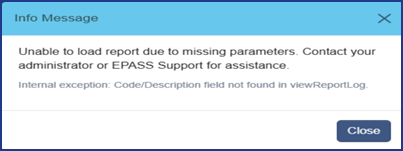
-
Executing a Crystal Report with an Empty Parameter Value
You can run a Crystal Report without selecting a value for a parameter. In this case, the Crystal Report runs and ignores the parameter.
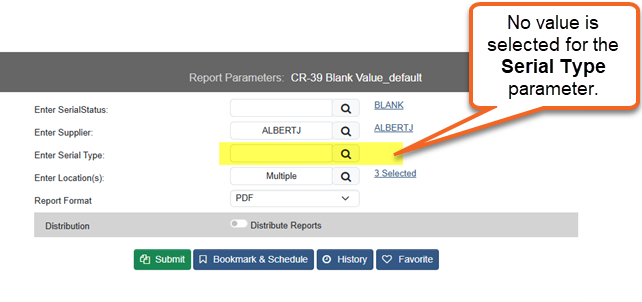
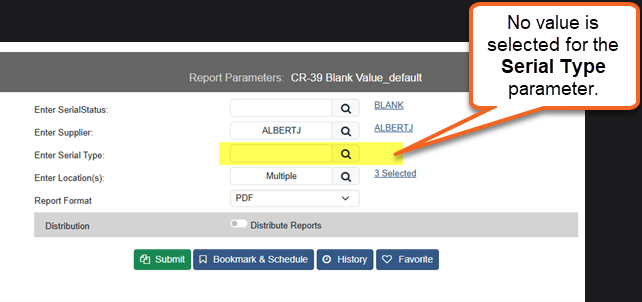
But if the Crystal Report expects a value for that parameter, then the report will fail with a missing parameter value error.
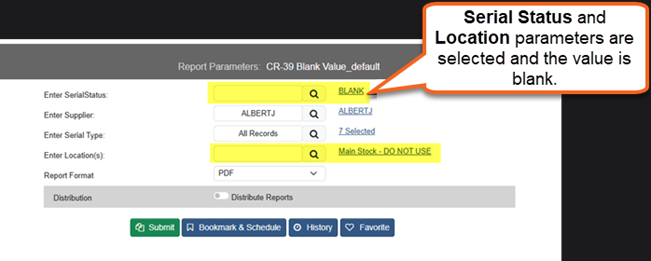
However, you can also select a blank parameter value if the static values or the underlying table have a blank code. In this case, the blank or empty value is used as a parameter to fetch the records for the report.

Feature Usage Report
As users navigate throughout the system, a log of which features, menus, and buttons were used is kept in a statistics table. This provides both the customer and EPASS with an understanding of which features are most favored and which features are rarely used.
The statistics log tracks: logging in and out, session expirations, menu clicks, and any buttons that were clicked. We can, for example, view how often the 'right-click' menu was used and compare it to the 'left-click' icon.
The report is easily modified in Crystal Reports to better suit the needs of how and what features would be monitored. For example, the report might be modified to omit specific user activity.
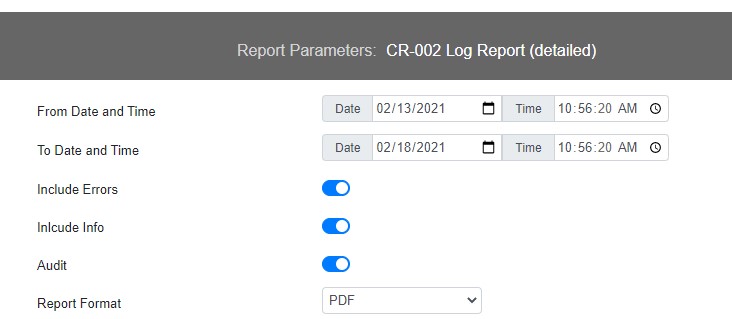
Logging the Report
The logging report allows a user to print entries from the standard EPASS logging table. This report can be used to view both EPASS Enterprise errors and EPASS Reports errors.
The report allows the user to select a date range and type of log entry.
Troubleshooting
"Missing Parameter Values" Error When Printing Crystal Reports with Subreports
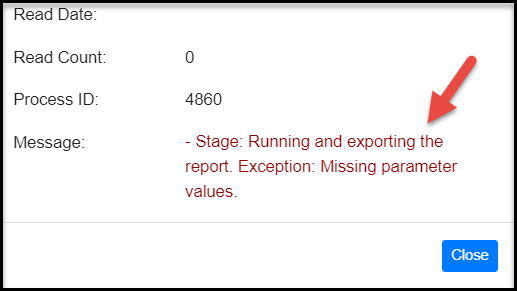
This error occurs because the link between a main report parameter and subreport parameter is not properly configured. When printing reports with subreports, each main report parameter needs to be explicitly linked to a subreport parameter.
To resolve this error, follow these instructions to link each main and subreport parameter field.
To Create the Field Links:
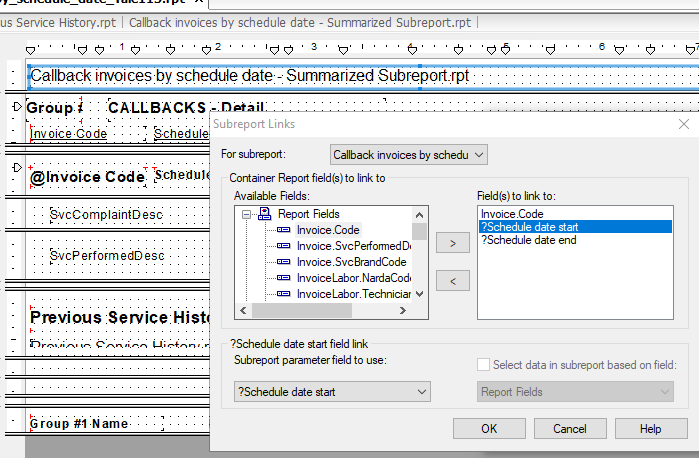
- From the main report, right-click the subreport, and then click Change Subreport Links.
- In the Subreport Links window, select a parameter field in Available Fields, and then click the > button to move it to Fields to link to.
- Select the subreport field name that you want to link to from the Subreport parameter field to use dropdown.
- Click the Select data in subreport based on field checkbox, and then select the field from the dopdown. If the value of the field is coming from user input, clear the Select data in subreport based on field checkbox.
-
Repeat steps 2–4 for each main report field that you need to link to a subreport field. When you're finished, click OK.
-
Save the report and then upload it to EPASS Reports.
"UI Control Fails to Load Any Data"
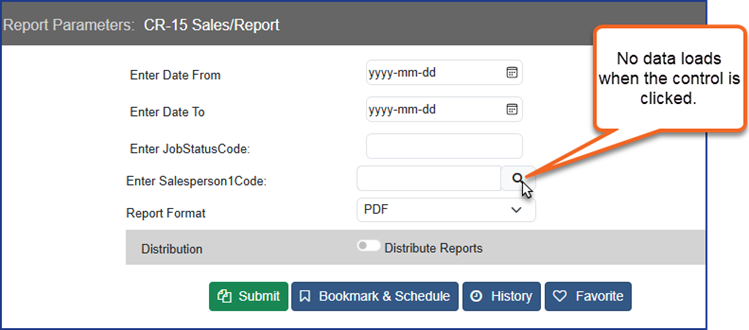
A UI Control does not load data as expected. The control may appear empty, fail to return results, or display an error.
This can occur when a Crystal Report parameter name uses a prohibited character.
To resolve this, remove any prohibited characters from all parameter names and revise the parameter references in the EPASS-Config formula. After updating the parameters and formula, redeploy to the EPASS Reports server.
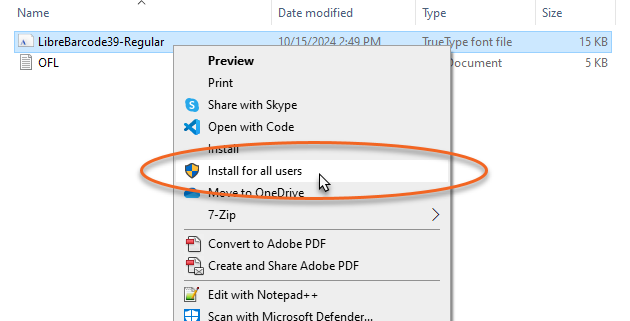
Installing the Barcode Font
To ensure that barcodes are displayed correctly when custom Crystal Reports are viewed in PDF format, the Libre Barcode 39, you need to install the Libre Barcode 39 font on your EPASS Reports server.
The font is free to use, and you can download it from Google Fonts.
To install the font, follow the directions below or contact EPASS Support for help.
-
Download and extract (unzip) the Font file to the EPASS Reports server.
-
Right-click LibreBarcode-39.ttf and then click Install for all users.
-
Once installed, the Libre Barcode 39 font is available in the list of fonts.
See Also
Updated July 6, 2026